Digital
Image Tutorial
Using 2CUTE
INK
By Chris
Sather
(http://cattsscratchingpost.blogspot.ca/)
1.
Open
up Microsoft Word.
2. Click on “INSERT”,
“PICTURE” , “FROM FILE” (wherever you have your digis saved is where you will
collect it from)
3. Double click image you
want to use, and it will appear on your Word document. It may not be the size you want, so I’m going
to teach you how to change that!
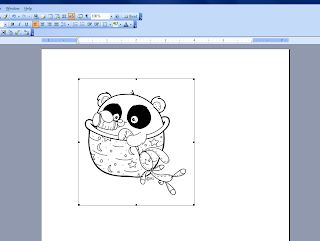
4. When I insert the BABY
PANDA image from 2Cute Ink, this is what my screen looks like.
5. Now, to save paper, I always try to print 4
images to a page, so
I will need to CROP this image before I
resize it.
In mid-crop:
Cropped:
6.
RESIZING: Click on your image so the
lines are showing around it (as in picture above). Put your cursor on one of the 4 corners – you
will see a diagonal arrow – this will keep the shape of the image without
distorting it. Drag the arrow/corner OUT
to make your image larger or IN to make your image smaller.
7. Once you have your desired size, you are
ready to PRINT!
(I
just have a Canon MP240 – nothing fancy and it prints great. The ink dries quickly and works well with
alcohol based markers)
8.
Now
onto the fun part – making a card with these ADORABLE images!!!
9.
I
have coloured Baby Panda with Copics (tons of tutorials on colouring so I won’t
bore you with those details!)
11.
Sponge the edges of your circle with ink
(I have used Mellow Moss from Stampin’ Up) – the sponges are round art sponges
that I cut into chunks (from a Dollar Store).
12.
I
have cut a 5” x 5” card base out of Kraft.
The yellow designer paper is cut at 4.75” x 4.75”. I am going to use a very simple layout so
that I can showcase the adorable image!
I have also chosen neutral colours so this card can be used for any
baby!
13.
Using
a scallop border punch and a 5” x 1.5” piece of Kraft paper, punch along one
edge of the Kraft piece.
14.
Attach
punched piece about 1” up from bottom of card.
Attach ribbon or ric rac along the top of the Kraft piece. Snip off edges with ribbon scissors.
15.
Using
pop dots, pop up image and place in center of card, about halfway down the
Kraft piece.
16.
Using
green pearls (or rhinestones), attach 3 on each side of scalloped circle.
17.
Add
2 more green pearls to each side of the Kraft strip on your card. Stamp sentiment below scallop in a dark
green.
18.
Add
Crystal Lacquer to the baby bottle for a 3 dimensional effect. To add a bit
more texture, add some Sakura Stardust Gelly pen to the stars and moons on the
blanket.
Thank you to Heidi at 2Cute Ink
for encouraging me to put together this tutorial for you and for letting me use Baby Panda! I had a lot of fun making it!!!
for encouraging me to put together this tutorial for you and for letting me use Baby Panda! I had a lot of fun making it!!!
I hope you enjoyed this tutorial! Please stop by the 2Cute Ink shop (http://www.shop.2cuteink.com/) to
check out the other adorable images that Heidi has for sale!
I am entering this into the Top Tip Tuesday challenge which is Lavishly Luscious Layers!
I am entering this into the Top Tip Tuesday challenge which is Lavishly Luscious Layers!
Hugs,
Chris


9 comments:
Wonderful card Chris and a fabby tutorial!
Helen x
Chris
Great card and your tutorial is so easy to follow. Love it.
Myrna
AWESOME job on the tutorial, Chris. I know how long it takes to document each step, edit the photos and then blog about them. You did a great job hitting all the important steps...and, as no surprise, ended with a super, fabulous card!
Gonna add a link for others to this :) hugs Nikki
Well done on the tut too
Chris this is fantastic! and your Tutorial is awesome and is so worth sharing on Top Tip Tuesday too! hope you come share! hugs me xx
Fab! to see you entering this Chris! Lots of people need to see it! thanks for sharing hunny x
Wow, thanks for sharing your tut and so happy Samantha asked you to. She's right, this will help a lot of people Chris. Love your finished card and the adorable image! Thanks for joining us at Top Tip Tuesday!!
Fantastic tutorial. I love using word for this technique and after seeing this, I'm certain more people will too. Your card is just FANTASTIC. Beautiful coloring and layers. :)
Thank you so much for playing along with us at Top Tip Tuesday!
Lisa xx
I can't thank you enough for this tutorial! I need it and will try it my next day off work this week. I have been wanting to learn how to do this. Thank you again so much!!!
Post a Comment